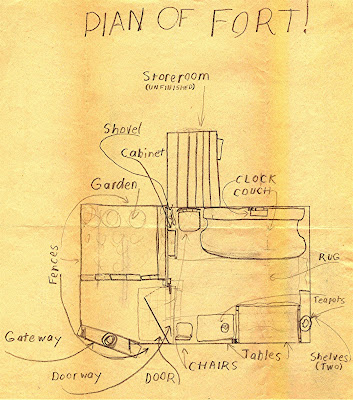
Everyone needs a clubhouse! You can build your own backyard shelter, retreat, or clubhouse even if you have never built anything before. The clubhouse above was built in 1959 by three kids aged 8, 9 and 11, with no money or help from grownups! I know; I was the 11-year-old who took this picture. I'm sharing here what I have learned since then.
Readers of all ages are welcome to comment with their own ideas, pictures or stories.
To help you on your way, I've written a book titled "Keep Out! Build Your Own Backyard Clubhouse", which is available through bookstores or at Amazon.com . Many of the items I post here are also in the book.

Wednesday, September 11, 2013

Kids Need Their Own Community


Kids need their own community, and a special place to experience it. A clubhouse, especially one they built themselves, gives kids a sense of privacy and independence, a safe place to talk, socialize, or decide whether to paint the place. They learn about consensus, and find that its fun to plan a bike trip or a cookout together. It's much more rewarding than sitting alone in front of the tube, or even sitting alone and texting. Hanging out with a bigger group is a far richer experience.

This is the kind of community that emerged when our random group of kids decided to build a clubhouse. Somehow the idea of building the thing together cemented us more as a group; we had a common project that everyone could contribute to. One kid provided the backyard (no easy task), another had found some good wood, another could pound nails pretty good, and even the youngest kid with no building skills had a knack for finding the coolest clubhouse-furnishings in the trash. We spent Saturdays and after-school hours at our clubhouse for a couple of years, tearing it apart and fixing it up continuously. It was an adventure!

I wrote Keep Out! Build Your Own Backyard Clubhouse to inspire kids and supportive grownups to get together and build a place of their own in which to gather, socialize, be a community!


Saturday, July 13, 2013

Need Any Help?

If you're trying to build your clubhouse but don't know what to do next, either as you are starting out or at some point in the middle, let me know.  You can comment to this post with a question, or e-mail me at mothesart@gmail.com. I'll help you if  I can!
 

Friends can help you too...

Wednesday, July 3, 2013

A Brick Clubhouse in Scotland

While on a trip in Scotland two years ago, I spotted this slate-roofed shelter in someone's back yard. It was about 8 feet by 8 feet in size, and looked quite old.


Saturday, May 25, 2013

Using Old Doors

Here is a way to build your clubhouse (or garden shed, studio, backyard guest room...) with very little cost, at least for the walls - use old doors.

In many neighborhoods, there are "anything goes" trash days, usually in the summer. (Look at your city's trash pickup schedule). This is when you can sometimes find old doors and windows on the curb. Also, the Re-Store, second-hand stores, St Vinnie's and architectural salvage yards also sell old doors and windows very cheap. Get doors made of real wood - not the plywood or composition "slab doors", which will disintegrate outside.

First, collect enough doors to roughly fill up your outside walls. You might need to find some narrow cabinet doors or windows to fill in gaps. Once you think have enough, then plan your floor size to fit the doors plus the studs in between to tie the doors to the floor and the roof.

To seal the gaps between the doors, use some 1 by 4 trim boards, as shown above. Build a roof in the Classic Clubhouse style and voila! you have a palace of doors!

Thursday, May 9, 2013

Getting Permission To Build a Clubhouse


Start with a simple clubhouse idea; this one might scare the grownups!
 

As soon as you utter the word “clubhouse”, parents and other People in Control will likely imagine a big mess to clean up.  So here is where you’ll need to think like a diplomat and probably a lawyer to argue your case.

Be careful not to choose a site too close to your neighbor’s house or on their land. If there is no fence, ask where the boundary might be. Also don’t use a neighbor’s or your own fence as one of your walls! Furthermore, don’t build in front of someone’s picture window or otherwise block their view. You will get complaints.  By all means promise to keep the area clean except where you are actually building your clubhouse, and then keep the promise!

Invite your parents or other People in Control to help find a good site for your clubhouse. If possible, have a second building site in mind so the People in Control have a choice. If that doesn’t work, impress them with your knowledge of developmental psychology: In recent years children have been increasingly deprived of the outdoors and nature. Child-development specialists such as Richard Louv have directly linked the absence of nature to the recent rise in obesity, attention disorders and depression among children. Show them Richard Louv’s website, http://richardlouv.com/last-child-movement, and then tell them, “You don’t want me to get fat, stupid or depressed do you?”

Another good argument is this: “I’ll be engaged in something creative, I’ll be learning a lot of practical skills, and you will know where I am!” Then show them the plans you drew so they will know more about your project, and that you are serious about doing it “right”. Tell them you’ll follow the safety tips listed in Chapter 2 and remind them you’ll keep the place as clean and neat as you can. Until they convince you it is impossible to build a clubhouse (you live in a high-rise apartment, for example), then keep trying!

If you live in a community or subdivision that is heavily laden with what they call owners agreements, covenants or deed restrictions, check the rules to see if you can build in your yard. In recent years, some towns and homeowners’ associations have ordered clubhouses removed because they are deemed unsafe, a fire hazard, unsightly, or all three. Many communities don’t want to be “exposed to risk” from lawsuits or insurance claims. This unfortunate trend is part of the reason kids are no longer allowed to get outside, get dirty and build clubhouses!

So go along with this system if you can. Show them your plan, tell them you are the builder, and see what happens.  If necessary, argue your case with the points listed above. If you have to, fight back by getting your parents or sympathetic neighbors to help you regain your outdoor freedom. The Children and Nature Network: http://childrenandnature.ning.com is a worldwide support group that advocates this very thing!

One idea, though it is a bit risky: get your grownup supporters to let you build a “protest clubhouse” and when Those in Power demand its removal, offer to sign a “no fault” letter that promises you won’t sue them or make a claim against their liability insurance. If that doesn’t work call in the local news media to make your point.  This is America, after all!  

Tuesday, April 30, 2013

Once a Root Beer Stand

In 1990 my daughters and I went on expeditions around our home in Northeast Wisconsin to find clubhouses or playhouses. In Kaukauna, we learned that this playhouse was originally built as a root beer stand and then remodeled.  My kids enjoyed posing in front of it to show off the careful attention to scale and detail.
It's still there today, and it definitely looks 23 years older. My kids have grown a bit since then as well.

Monday, April 8, 2013

Our Second Clubhouse

      After our first clubhouse out on the vacant lot (above on masthead) got wrecked by some kids, four of us formed a club and build this clubhouse.
      It turned out that Kathy (seated at right) got us permission to use a fenced-in back yard her parents only used for storing junk and extra lumber; Chris, in the doorway, knew how to find really cool stuff in the trash, Chele, seated at left, was Kathy's friend, and I (who took the picture) was able to build it. The other kids helped by finding some of the wood.
     We built this from wood we found or that the neighbors donated. As Christmas approached, we needed paint and more nails to finish the clubhouse. When my mom asked what I wanted Santa to bring me, I quickly replied, "About five pounds of 8-penny nails and a gallon of turquoise paint!" Santa came through, and the clubhouse, in this picture, was bright turquoise!

Sunday, March 31, 2013

The One That (Almost) Got Away


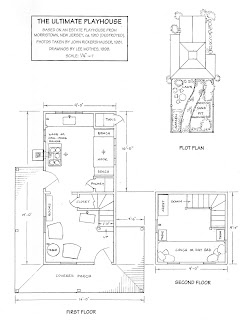
On large estate-house grounds, elaborate playhouses were often constructed for the kids. This one Is my favorite of any I've seen so far. It was discovered by New Jersey resident John Rickershauser:

John lived near an old country estate in New Jersey, which was eventually razed for a condominium development. Just before the demolition, he was out walking (fortunately with his camera handy) when he spotted this wonderful but neglected playhouse on the grounds. These estate playhouses often had running water, wood- or coal-fired cook stoves and electric lights, and I suspect this one had it all. The fence alone is an architectural treasure.


I drew a floor plan of this in case anyone wants to build it!
 
Photos contributed by John P. Rickershauser

Thursday, March 14, 2013

Two-story Playhouse in Tucson


In Tucson, Arizona, having a lot of opening windows is a good idea to let cooling breezes flow through. This playhouse was built of 2" by 2" framing and 1/2" thick OSB panels, all brightly painted. Another bonus is the high ceiling at one end, tall enough for a cozy loft.

Saturday, February 23, 2013

How to Pound (and unbend) a Nail

Here's how to pound a nail, and what usually happens when you are just starting out.
Don't worry about bent nails, keep trying!


To unbend bent nails, try these techniques:


Friday, February 15, 2013

Clubouse Book Arriving Soon!

My newly minted book about building clubhouses, titled Keep Out! Build Your Own Backyard Clubhouse will be coming out on march 27. It will contain a lot of the stuff seen on this blog, and is already available for pre-order on Amazon. Here's a picture of the cover:


Beginning this coming April, I will be going on the road to talk about the book, and just for fun, I built this model clubhouse, 9 inches tall, complete with the sawhorses (One of the nine tools!)
 
 
I even finished the inside, but left one side open to show how the walls are framed.


The quarter by the chair shows the scale!

Tuesday, February 12, 2013

9 Essential Tools

You'll only need nine essential hand tools to build your clubhouse.

1.  A hammer  that you can easily swing to pound in nails. For kids, a 12-ounce to 16-ounce "finish hammer", as shown above,  is about right. If you are buying one, pick them up, and swing the different sizes for the right weight.
 
 
*********************************************************************************

2. A tape measure. A 10-foot or 12-foot tape is long enough for a clubhouse. These are also small enough to easily fit in your hand or your pocket.

 
*************************************************************************
 
3. A handsaw. Get one of these short "Sharktooth" saws made by Stanley. They are very sharp, sized right for kids, will fit in a toolbox, and not too expensive.

********************************************************************************

4. A pencil. Any pencil will work.

********************************************************************************
5. A framing square.  This is the perfect tool to mark boards for cutting with your saw. Get the smaller (7 inches on a side) metal or plastic one. The marks on it will be helpful for cutting angles later!

*********************************************************************************


6. A screwdriver. Get a standard and a phillips-style screwdriver, or a combination screwdriver that includes both.

*********************************************************************************

 
 7. A level. A nine-inch long "Torpedo" type plastic level will work fine. Also, this small level will fit in any tool box.

*********************************************************************************

8. A pry bar. This is your tool for fixing goofs, or for helping with alterations and room additions later on. Sometimes called a "Wonder Bar"; Stanley Tools makes the best one.


*********************************************************************************


9. Sawhorses. These are necessary for sawing boards safely. You can buy a set or build the ones shown above. The lower height ( 24 inches) of these hand-built ones is better for young builders.


*********************************************************************************


Extra: A Nail pouch or tool belt. Lumber yards sell these canvas ones for very little.


Wednesday, January 30, 2013

How to find wood and other stuff


You can either buy new materials or find them around your neighborhood.

If you don’t have any money, finding the wood for your clubhouse can be a challenge, but it can be done. Keep an eye out as you walk or bike-ride around your neighborhood. Ask around! Is there an old shed nearby that you can tear down in exchange for the wood? How about that fence that fell down a month ago? Does so-and-so want that window sitting in his garage? With patience and persistence, you’ll likely get the lumber, windows, paint, and whatever else you’ll need for your clubhouse with the help of your friends and neighbors.

Getting materials is also where co-operation comes into play. If your friends (and their friends) can help donate the stuff you need to build the clubhouse, then everyone will benefit! This is the point where you might want to write up some sort of club agreement where everyone who contributes wood or other materials can be part of the club on some level. Trust will play a big part here.

It is also likely that you will have to buy some of the lumber and the nails from a lumberyard, so you will need money and a car. If you still need the Basic Tools listed in Chapter 2, you’ll need to shop for them as well. This, along with the permission thing, brings up co-operation with grownups. If you offer to give them something they need, beyond what they already expect of you, there is a good chance you will get the materials and tools you will need. In the process you’ll become very good at real-world negotiating, a great lifetime skill!
 
*******************************

 
          You can find cheap recycled stuff at salvage yards, resale shops, St Vincint de Paul’s or other thrift shops. Hardware store paint departments often have returned custom-color paints for sale at $2. to $5. a can, and it’s good paint if you like the color! (Avoid oil-based paints, though)  
          Another good source: Habitat for Humanity operates The Restore, a chain of used building-material outlets. They have everything including lumber, odd furniture, nails and hardware. It’s an adventure!


Sunday, January 20, 2013

Wood and Nails

Once you've drawn a plan and have permission, you can start looking for wood for your clubhouse.
 
A clubhouse can be built with just a few different kinds of boards, all held together with a few sizes of nails. It's a good idea to learn the carpenter words for the boards as they are used. This is what the frame of a possible clubhouse might look like, and what the pieces are called:


The floor is held up by two 4" by 4" thick beams called foundation sills that are 8 feet long. These support  seven 2" by 4" thick floor joists 6 feet long, which then support the floor boards.  The floor supports the walls which support the roof. To make them strong, the walls are built with studs, plates and other pieces; all from 2" by 4" thick boards. Thinner boards or plywood then cover up the 2 by 4s. I'll show you how to put all this together in several steps!
 
Most nails come in one-pound or five-pound boxes. For starters, get a couple of 1-pound boxes of 6d, 8d and 16d construction nails called "coated sinkers". Exterior galvanized nails are good for nailing on trim boards or siding that will get rained on. These are the kind used in house building everywhere. There are a few other kinds of nails or screws you might be using as well: 


Next: How to find wood and other stuff ... 

Thursday, January 17, 2013

Find a Building Site

 
Take some time to find a good place for your clubhouse. Your own fenced-in back yard is the best, but any space out of the way will work. Front yards are made to look at, so your parents (and complaining neighbors) probably won’t let you build there. A vacant lot or nearby woods might work, but there is a chance that other kids will wreck it while you’re away. A tucked-away corner in a back yard, maybe by the garage, often works the best. If your summers are hot, try to find a shady spot.  

Thursday, January 10, 2013

Getting Permission


Is there a place here for me?

            Parents and other People in Control will likely imagine a big mess to clean up as soon as you utter the word “clubhouse.” So here is where you’ll need to think like a diplomat and talk like a lawyer to argue your case.
            Be careful not to choose a site too close to your neighbor’s house or on their land. If there is no fence, ask where the boundary might be. Also don’t use a neighbor’s or your own fence as one of your walls without permission! Furthermore, don’t build in front of someone’s picture window or otherwise block their view. You will get complaints.  By all means PROMISE to keep the area clean except where you are actually building your clubhouse, and then KEEP the promise!
Invite your parents or other People in Control to help find a good site for your clubhouse. Also, have a second-choice building site in mind so the People in Control have a choice. If that doesn’t work, tell them that in recent years children have been increasingly deprived of the outdoors and nature, and child-development specialists such as Richard Louv have directly linked the absence of nature/being outside to the recent rise in obesity, attention disorders and depression among children. Show them Richard Louv’s website, http://richardlouv.com/last-child-movement, and then tell them, “You don’t want me to get fat, crazy or depressed, do you?”
Another good argument is this: “I’ll be engaged in something creative, I’ll be learning a lot of practical skills, and you will know where I am!” Then show them your plans (see below) so they’ll know more about your project, and that you are serious about doing it “right”. Tell them you’ll follow the safety tips listed above and remind them you’ll keep the place as clean and neat as you can. If they still resist, keep trying!
**********************
            If you live in a community or subdivision that is heavily laden with covenants or deed restrictions, check the rules to see if you can build in your yard. In recent years, some towns and homeowners’ associations have ordered clubhouses removed because they are deemed unsafe, a fire hazard, unsightly, or all three. Many communities don’t want to be “exposed to risk” from lawsuits or insurance claims. This unfortunate trend is part of the reason kids are no longer allowed to create things on their own such as clubhouses.
So fight back! Get your parents or sympathetic neighbors to help you regain your outdoor freedom. The Children and Nature Network: http://childrenandnature.ning.com, is a worldwide support group that advocates this very thing!  One idea: get your supporters to let you build a “protest clubhouse” and when Those in Power demand its removal, offer to sign a “no fault” letter that promises you won’t ever sue them or make a claim against their liability insurance. If that doesn’t work call in the local news media to make your point.  This is America, after all!         


Friday, January 4, 2013

Plans

Any kind of plan will help!

Draw a Plan
This works a lot better than just starting out nailing boards together. A plan is simply a way to think about what you want, and then how to get there. Plans might also help you get permission and support for your project. Here’s how to plan your clubhouse:

Think about a space big enough to hold yourself and your friends. Think about what you might want to do in it, and maybe write a list: will you want a desk or a couch? Will you want chairs or just cushions on the floor? Will you want a place to store or hide stuff, or a secret exit?  A 6-foot by 8-foot clubhouse will comfortably hold 4 people, so I am going to use this size for my demonstration: 
Then check the site you’ve chosen to see if your clubhouse will fit. With your tape measure, check the actual size on the ground if you need to. You might have to make it square-shaped or maybe four feet wide and ten feet long to fit a tight space!
Also think about how you’d like to get in and out…what kind of door?  How much light and ventilation do you want? What kind of windows? Some kids like their clubhouses dark and den-like, others like a lot of light so they can read or see what’s going on outside. A sliding window or two are great for ventilation on hot days.

You may want to build a different shape or size, so draw your plan first. Later you can add more rooms if there is enough space around your clubhouse.